vscode中调试应用程序
一、调试chrome中网页
1.安装vscode插件
在vscode插件市场搜索JavaScript Debugger (Nightly),并安装 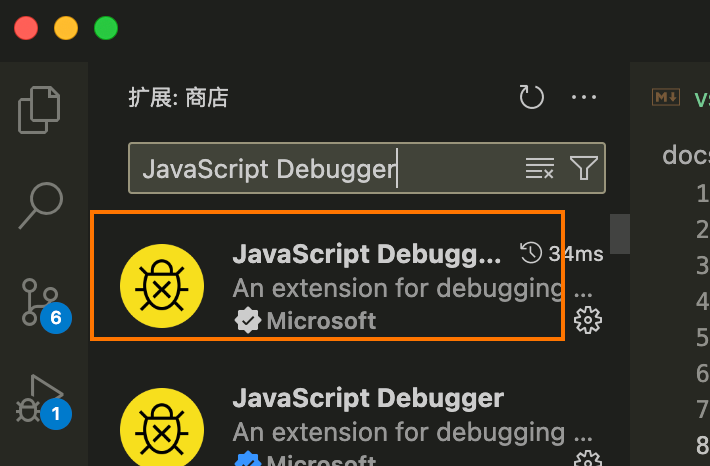
2.配置launch模式
1️⃣. 在项目根目录新建.vscode文件夹,然后在.vscode中新建launch.json文件,使用 launch 模式进行 debugger
// launch.json配置
{
  "version": "0.2.0",
  "configurations": [
    {
      "name": "Launch Chrome",
      "request": "launch",
      "type": "chrome",
      "url": "http://localhost:5173/",//该地址为项目配置的开发服务器运行地址
      "webRoot": "${workspaceFolder}",
      "sourceMaps": true,
    },
  ]
}
// launch.json配置
{
"version": "0.2.0",
"configurations": [
{
"name": "Launch Chrome",
"request": "launch",
"type": "chrome",
"url": "http://localhost:5173/",//该地址为项目配置的开发服务器运行地址
"webRoot": "${workspaceFolder}",
"sourceMaps": true,
},
]
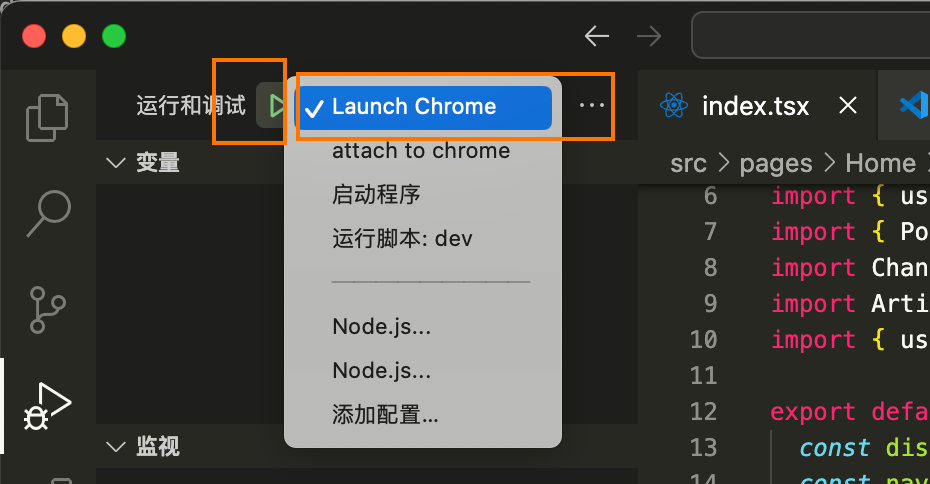
}2️⃣. 启动项目开发服务器,并确保服务运行地址为 1️⃣中url的地址  3️⃣. 找到vscode左侧“运行与调试”菜单,在绿色按钮后的下拉菜单中选择 Launch Chrome,然后点击绿色箭头,则会打开新的chrome浏览器,并在chrome中运行项目,
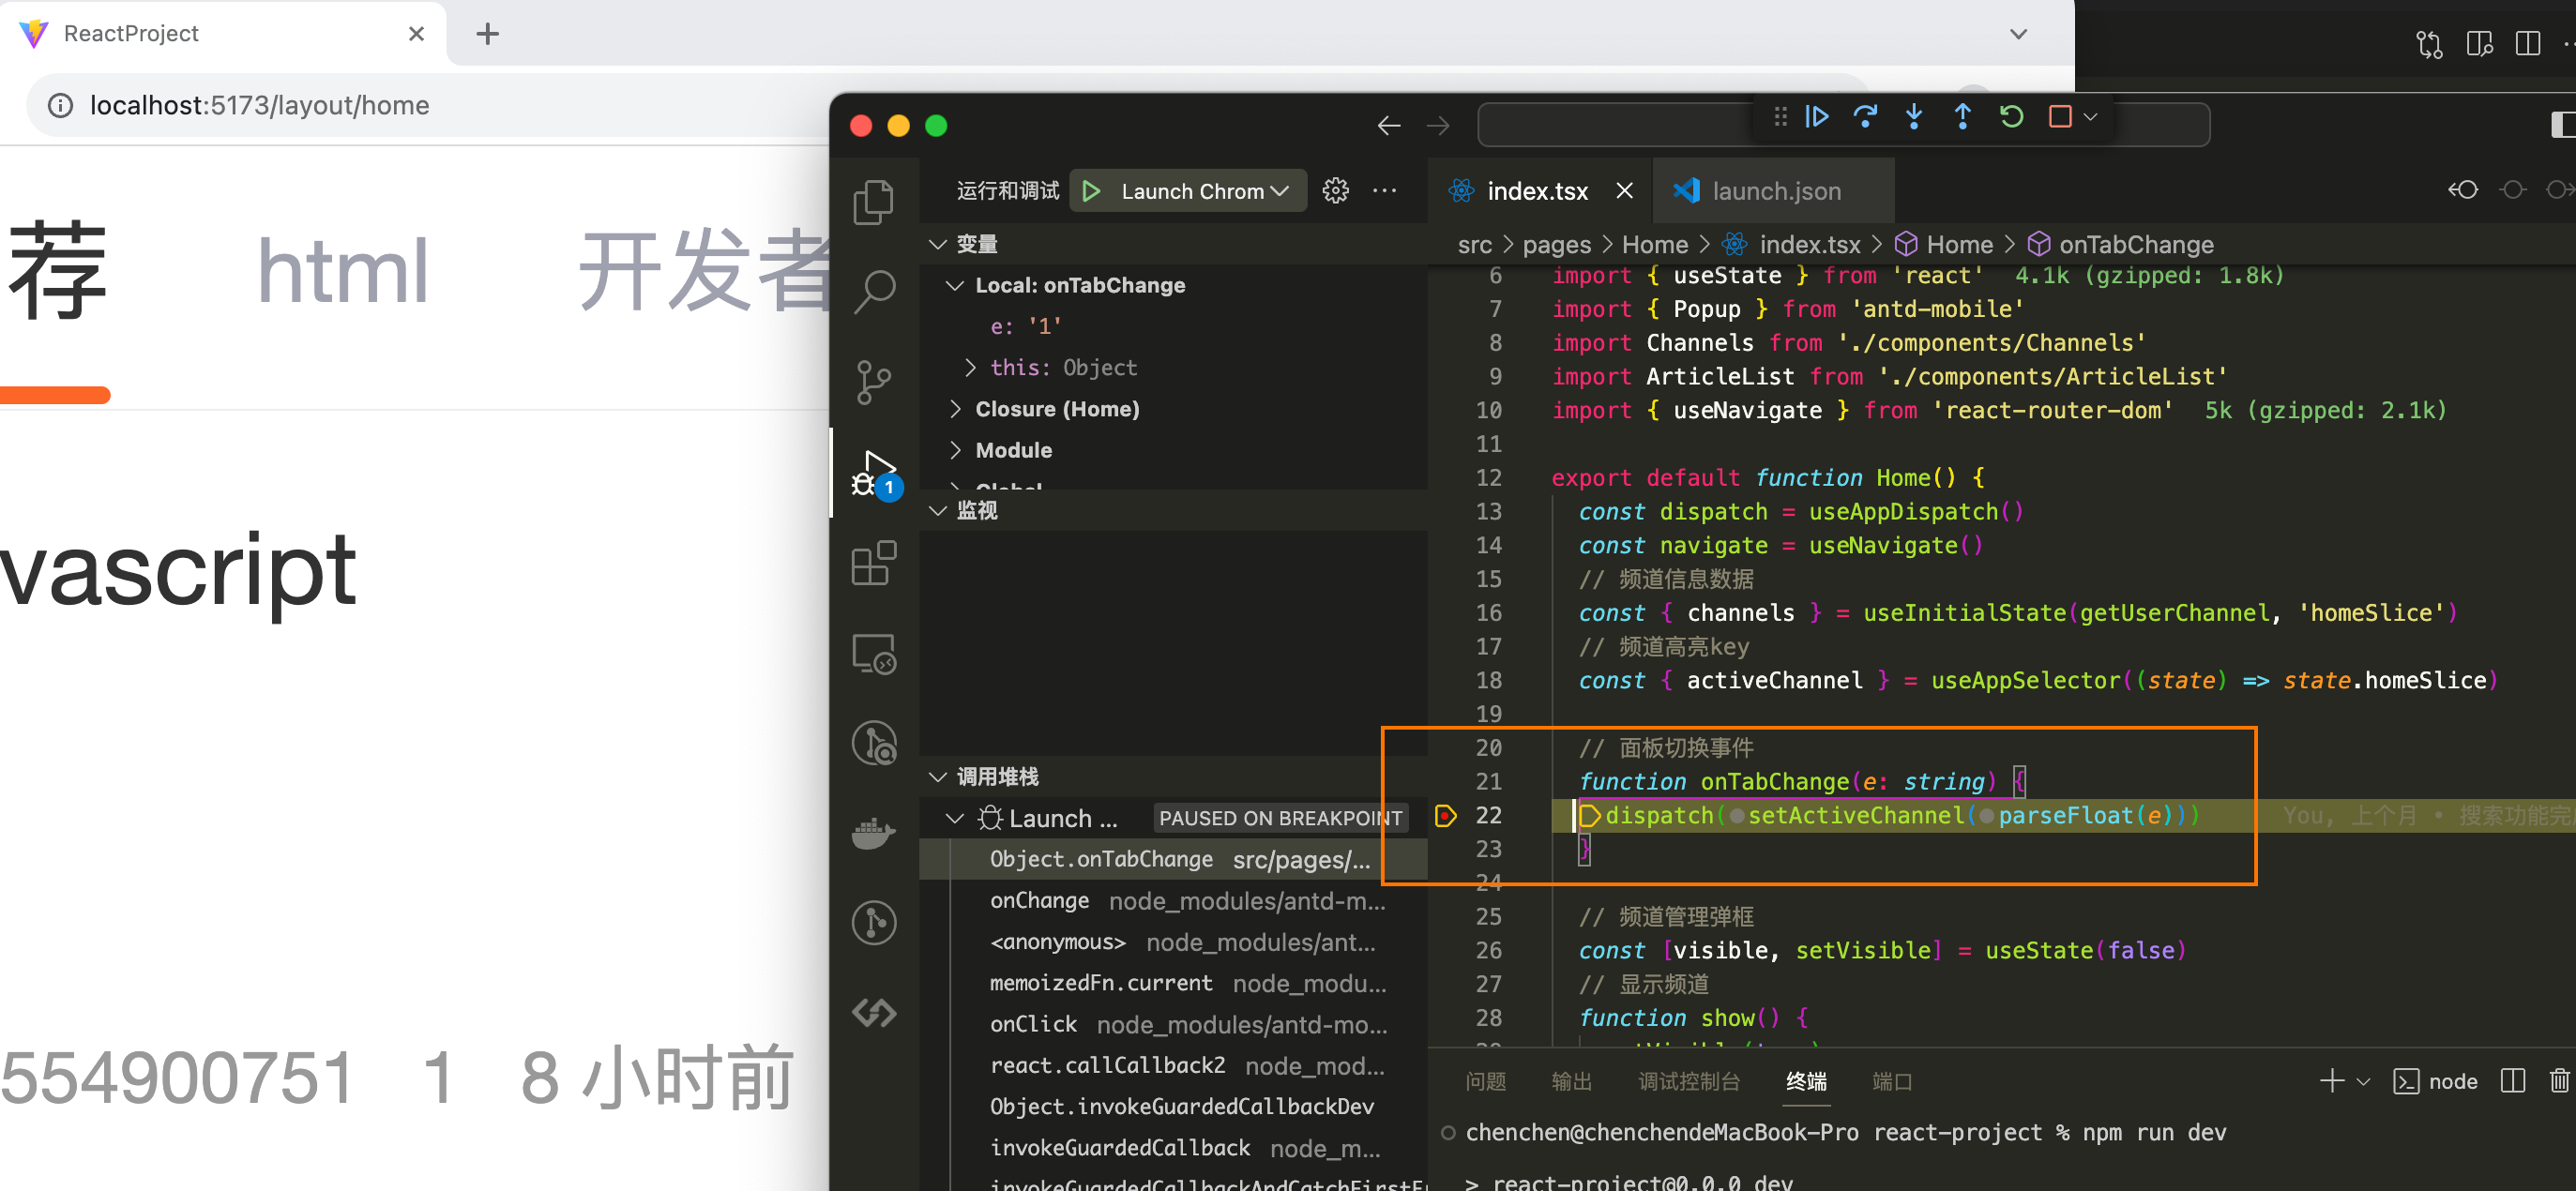
  4️⃣. 在vscode的中打断点调试项目
3.配置attach模式
因launch模式打开的浏览器不能使用插件,比如vue tool 等,故我们可以使用attach模式调试。
1️⃣.将chrome设置为远程调试模式启动,具体方法为
window:
首先先关闭所有的Chrome窗口(确保任务管理器中Chrome进程都被关闭掉了!),找到Chrome启动快捷键,右键打开属性,在“目标”中增加启动参数--remote-debugging-port=9222 ,记住这里的端口为 9222,大致如下:
"C:\Program Files (x86)\Google\Chrome\Application\chrome.exe" --remote-debugging-port=9222"C:\Program Files (x86)\Google\Chrome\Application\chrome.exe" --remote-debugging-port=9222mac:
由于mac一般没有桌面快捷方式,可以编写带启动参数的chrome启动sh脚本,可以命名为start-chrome.sh,脚本内容
#!/bin/bash
/Applications/Google\ Chrome.app/Contents/MacOS/Google\ Chrome --remote-debugging-port=9222
#!/bin/bash
/Applications/Google\ Chrome.app/Contents/MacOS/Google\ Chrome --remote-debugging-port=92222️⃣. 在项目根目录新建.vscode文件夹,然后在.vscode中新建launch.json文件,使用 attach 模式进行 debugger
// launch.json配置
{
  "version": "0.2.0",
  "configurations": [
    {
      "type": "chrome",
      "request": "attach",
      "name": "attach to chrome",
      "urlFilter": "https://localhost:5173/*",//该地址为项目配置的开发服务器运行地址
      "port": 9222,
      "webRoot": "${workspaceFolder}",
      "sourceMaps": true,
      "sourceMapPathOverrides": {
        "webpack:///src/*": "${webRoot}/*"
      }
    },
  ]
}
// launch.json配置
{
"version": "0.2.0",
"configurations": [
{
"type": "chrome",
"request": "attach",
"name": "attach to chrome",
"urlFilter": "https://localhost:5173/*",//该地址为项目配置的开发服务器运行地址
"port": 9222,
"webRoot": "${workspaceFolder}",
"sourceMaps": true,
"sourceMapPathOverrides": {
"webpack:///src/*": "${webRoot}/*"
}
},
]
}3️⃣. 启动项目开发服务器,并确保服务运行地址为 2️⃣中url的地址  4️⃣. 启动带debug参数的chrome,并输入开发服务器地址(
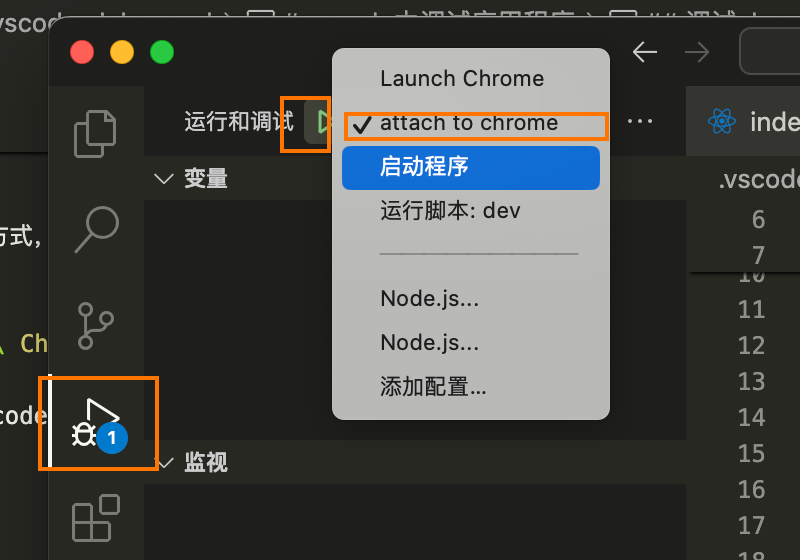
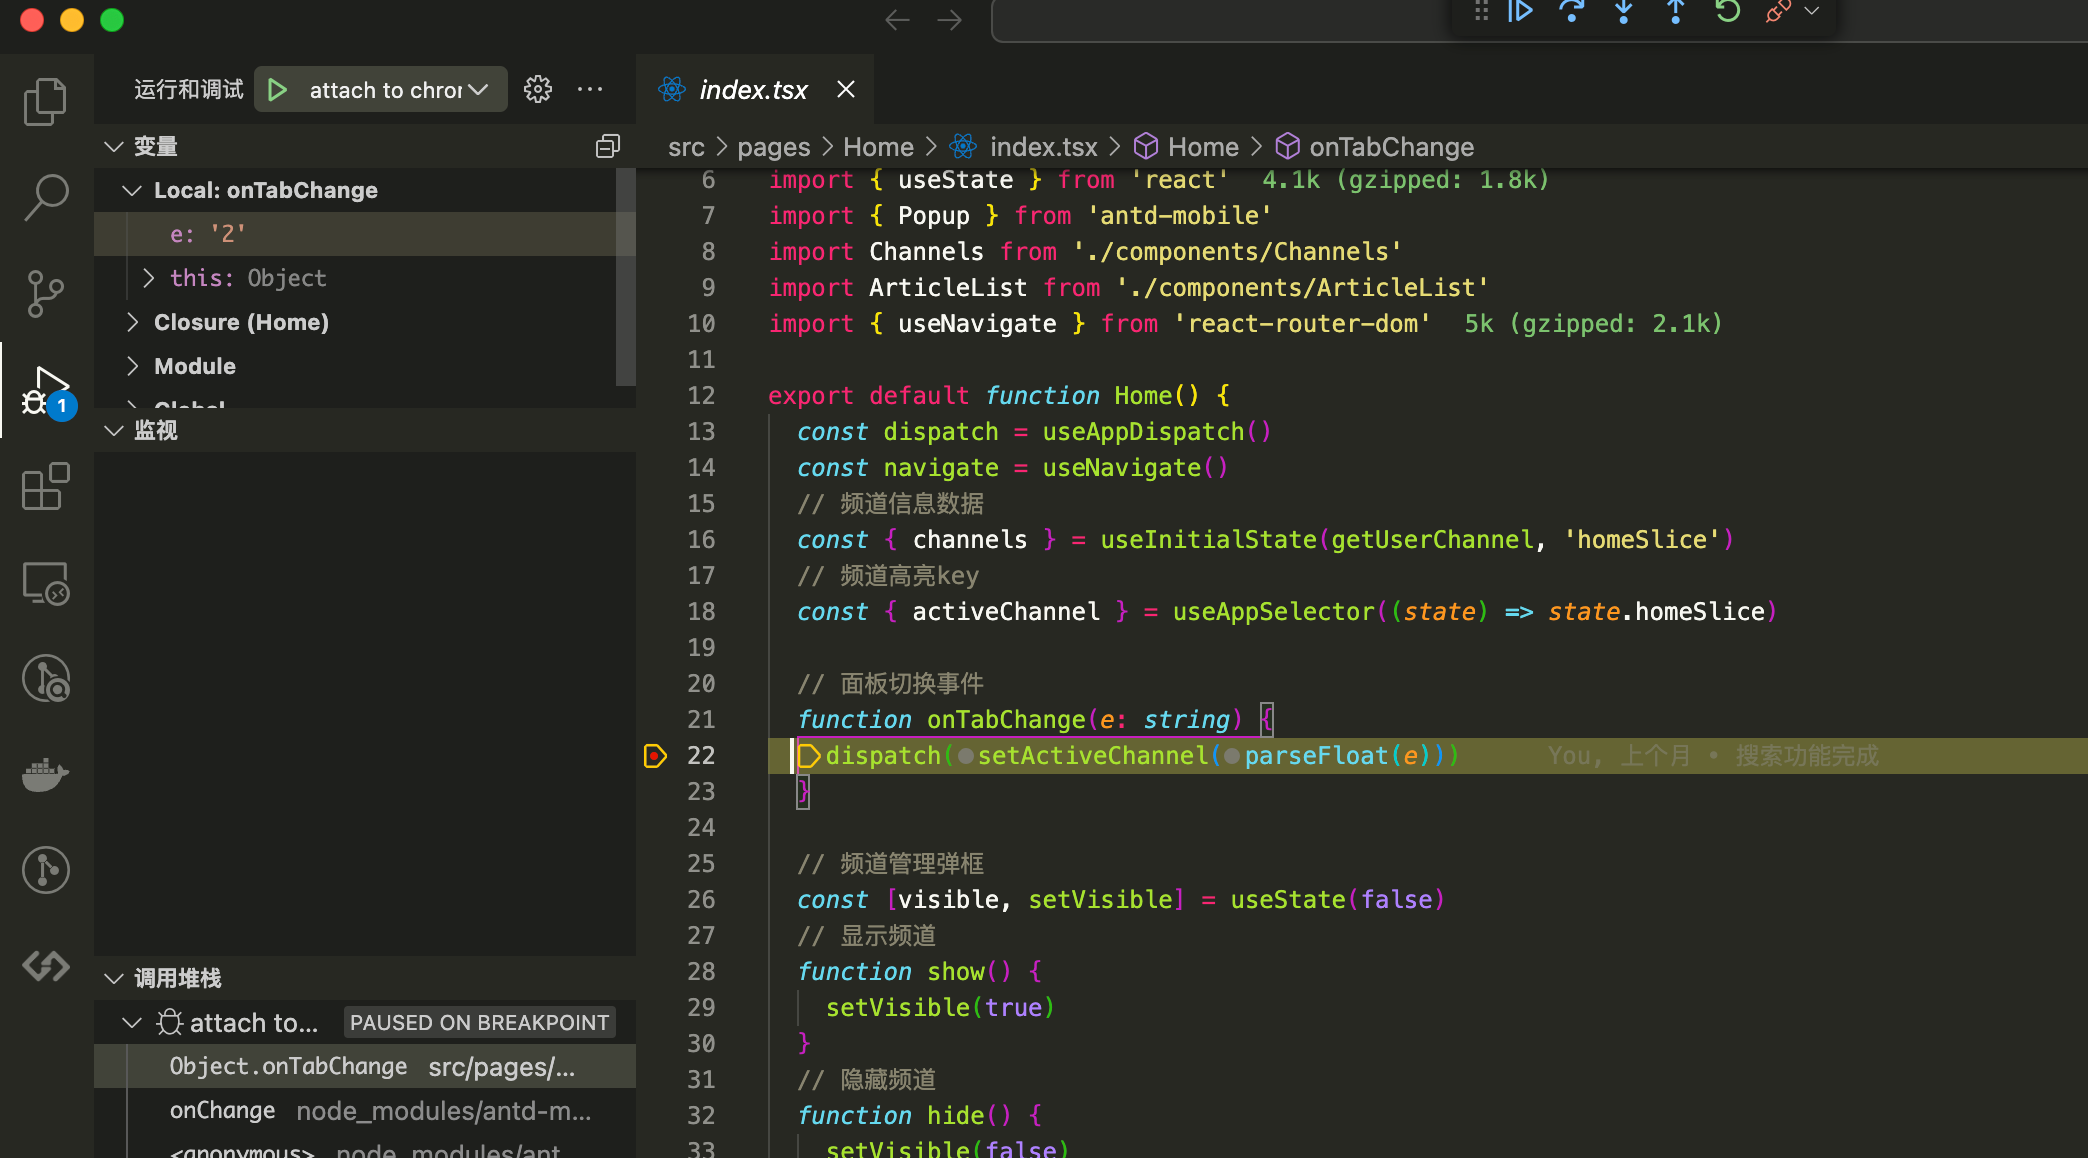
https://localhost:5173/),运行项目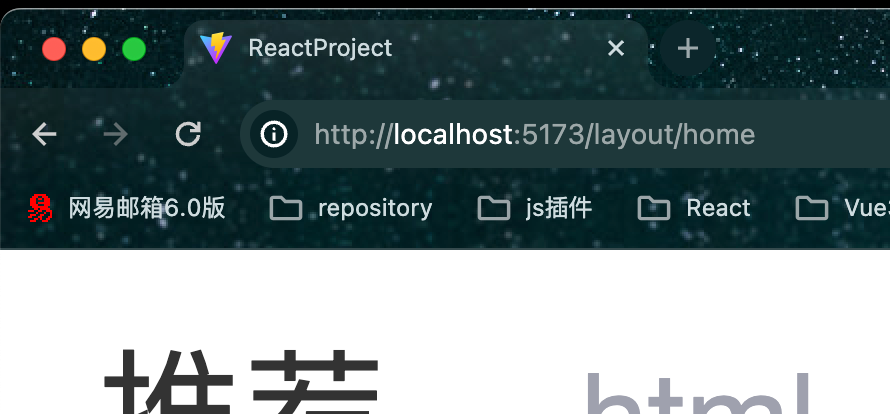 5️⃣. 找到vscode左侧“运行与调试”菜单,在绿色按钮后的下拉菜单中选择 attach to chrome,然后点击绿色箭头,就可以调试已经在chrome中打开的项目了,
  6️⃣. 在vscode的中打断点调试项目
二、调试vscode扩展插件(Language Server Protocol,简称lsp服务)
1. launch模式调试client端
1️⃣. 在项目根目录新建.vscode文件夹,然后在.vscode中新建launch.json文件,使用 launch 模式进行 debugger
// A launch configuration that compiles the extension and then opens it inside a new window
{
	"version": "0.2.0",
	"configurations": [
		{
			"type": "extensionHost",
			"request": "launch",
			"name": "Launch Client",
			"runtimeExecutable": "${execPath}",
			"args": ["--extensionDevelopmentPath=${workspaceRoot}"],
			"outFiles": [
				"${workspaceRoot}/client/out/**/*.js",
				"${workspaceRoot}/server/out/**/*.js"
			],
			"autoAttachChildProcesses": true,
			"preLaunchTask": {
				"type": "npm",
				"script": "watch"
			}
		}
	]
}
// A launch configuration that compiles the extension and then opens it inside a new window
{
"version": "0.2.0",
"configurations": [
{
"type": "extensionHost",
"request": "launch",
"name": "Launch Client",
"runtimeExecutable": "${execPath}",
"args": ["--extensionDevelopmentPath=${workspaceRoot}"],
"outFiles": [
"${workspaceRoot}/client/out/**/*.js",
"${workspaceRoot}/server/out/**/*.js"
],
"autoAttachChildProcesses": true,
"preLaunchTask": {
"type": "npm",
"script": "watch"
}
}
]
}2️⃣. 找到vscode左侧“运行与调试”菜单,在绿色按钮后的下拉菜单中选择 Launch Client,然后点击绿色箭头,则会打开一个加载了插件的vscode窗口,
也可以直接按F5,即可 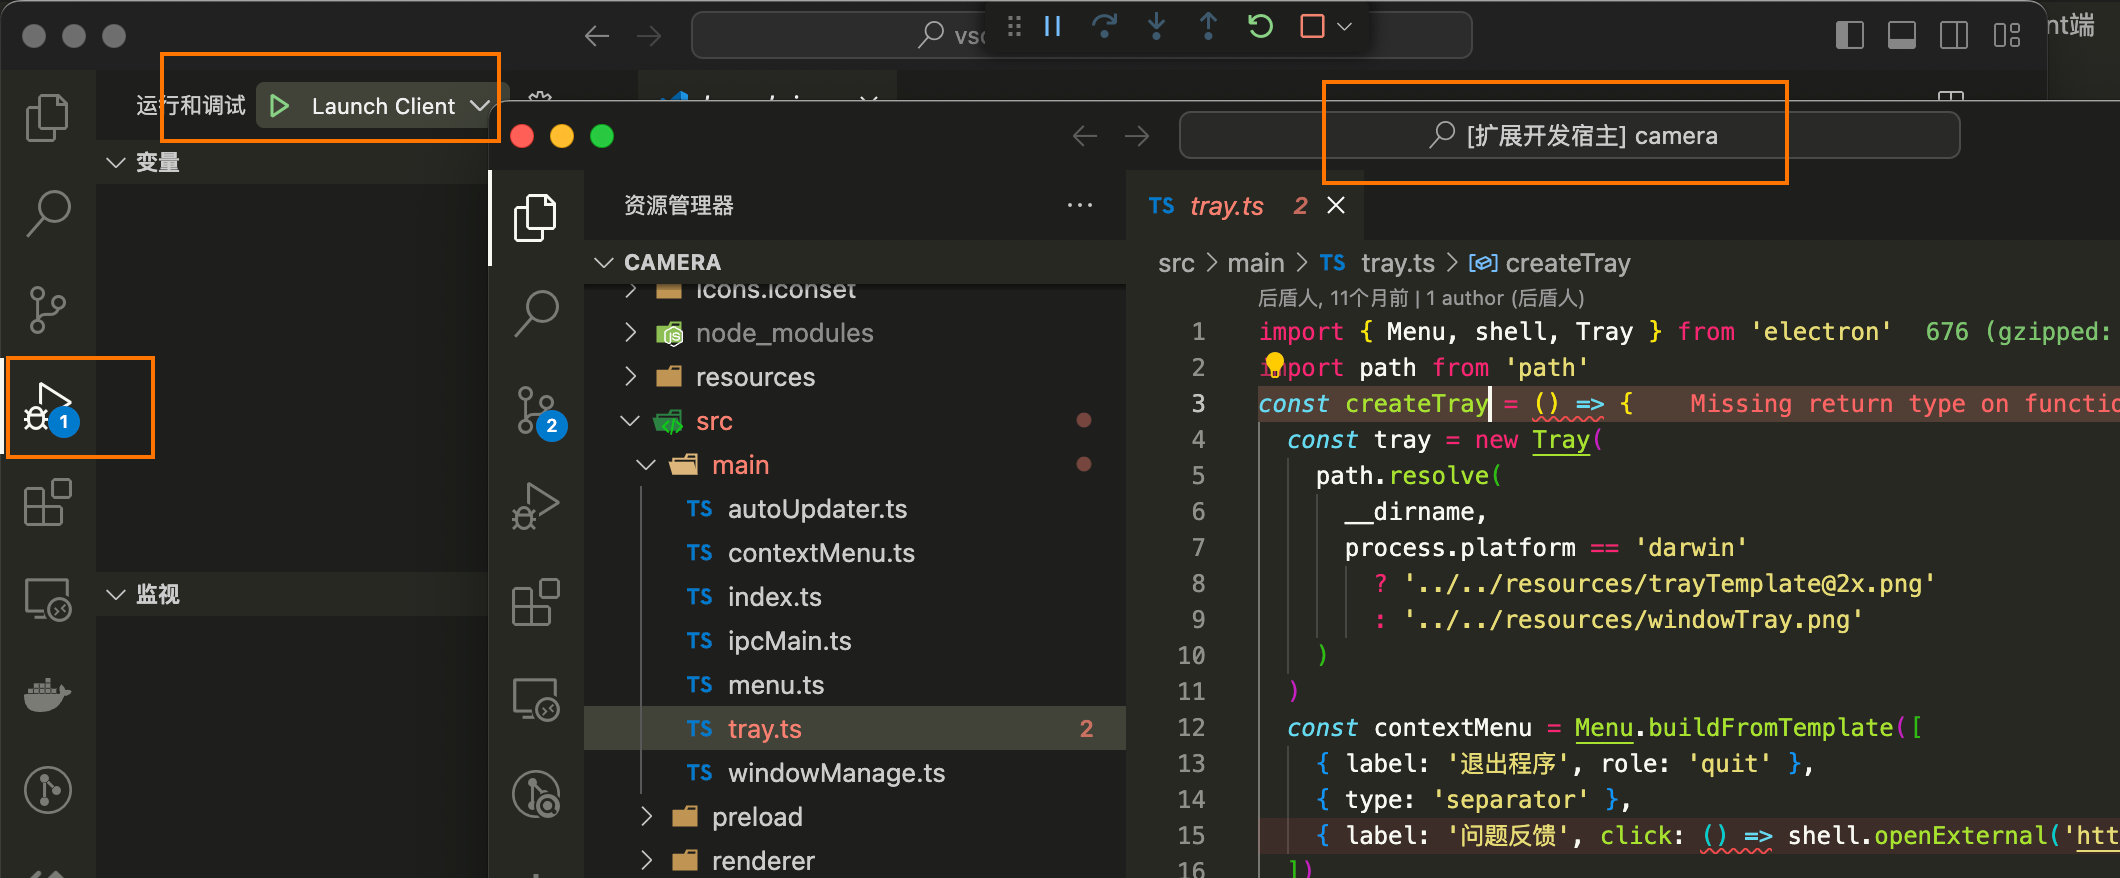
2.attach模式调试server端
1️⃣. 在项目根目录新建.vscode文件夹,然后在.vscode中新建launch.json文件,使用 launch 模式进行 debugger
// A launch configuration that compiles the extension and then opens it inside a new window
{
	"version": "0.2.0",
	"configurations": [
		{
			"name": "Attach To Server",
			"port": 6009,
			"request": "attach",
			"type": "node"
		},
		{
			"type": "extensionHost",
			"request": "launch",
			"name": "Launch Client",
			"runtimeExecutable": "${execPath}",
			"args": ["--extensionDevelopmentPath=${workspaceRoot}"],
			"outFiles": [
				"${workspaceRoot}/client/out/**/*.js",
				"${workspaceRoot}/server/out/**/*.js"
			],
			"autoAttachChildProcesses": true,
			"preLaunchTask": {
				"type": "npm",
				"script": "watch"
			}
		},
		{
			"name": "Language Server E2E Test",
			"type": "extensionHost",
			"request": "launch",
			"runtimeExecutable": "${execPath}",
			"args": [
				"--extensionDevelopmentPath=${workspaceRoot}",
				"--extensionTestsPath=${workspaceRoot}/client/out/test/index",
				"${workspaceRoot}/client/testFixture"
			],
			"outFiles": ["${workspaceRoot}/client/out/test/**/*.js"]
		}
	],
	"compounds": [
		{
			"name": "Both Client And Server",
			"configurations": ["Launch Client","Attach To Server"]
		}
	]
}
// A launch configuration that compiles the extension and then opens it inside a new window
{
"version": "0.2.0",
"configurations": [
{
"name": "Attach To Server",
"port": 6009,
"request": "attach",
"type": "node"
},
{
"type": "extensionHost",
"request": "launch",
"name": "Launch Client",
"runtimeExecutable": "${execPath}",
"args": ["--extensionDevelopmentPath=${workspaceRoot}"],
"outFiles": [
"${workspaceRoot}/client/out/**/*.js",
"${workspaceRoot}/server/out/**/*.js"
],
"autoAttachChildProcesses": true,
"preLaunchTask": {
"type": "npm",
"script": "watch"
}
},
{
"name": "Language Server E2E Test",
"type": "extensionHost",
"request": "launch",
"runtimeExecutable": "${execPath}",
"args": [
"--extensionDevelopmentPath=${workspaceRoot}",
"--extensionTestsPath=${workspaceRoot}/client/out/test/index",
"${workspaceRoot}/client/testFixture"
],
"outFiles": ["${workspaceRoot}/client/out/test/**/*.js"]
}
],
"compounds": [
{
"name": "Both Client And Server",
"configurations": ["Launch Client","Attach To Server"]
}
]
}2️⃣. 找到vscode左侧“运行与调试”菜单,在绿色按钮后的下拉菜单中选择 Both Client And Server,然后点击绿色箭头,则会打开一个加载了插件的vscode窗口,此时会启动client调试服务和一个attach调试服务, 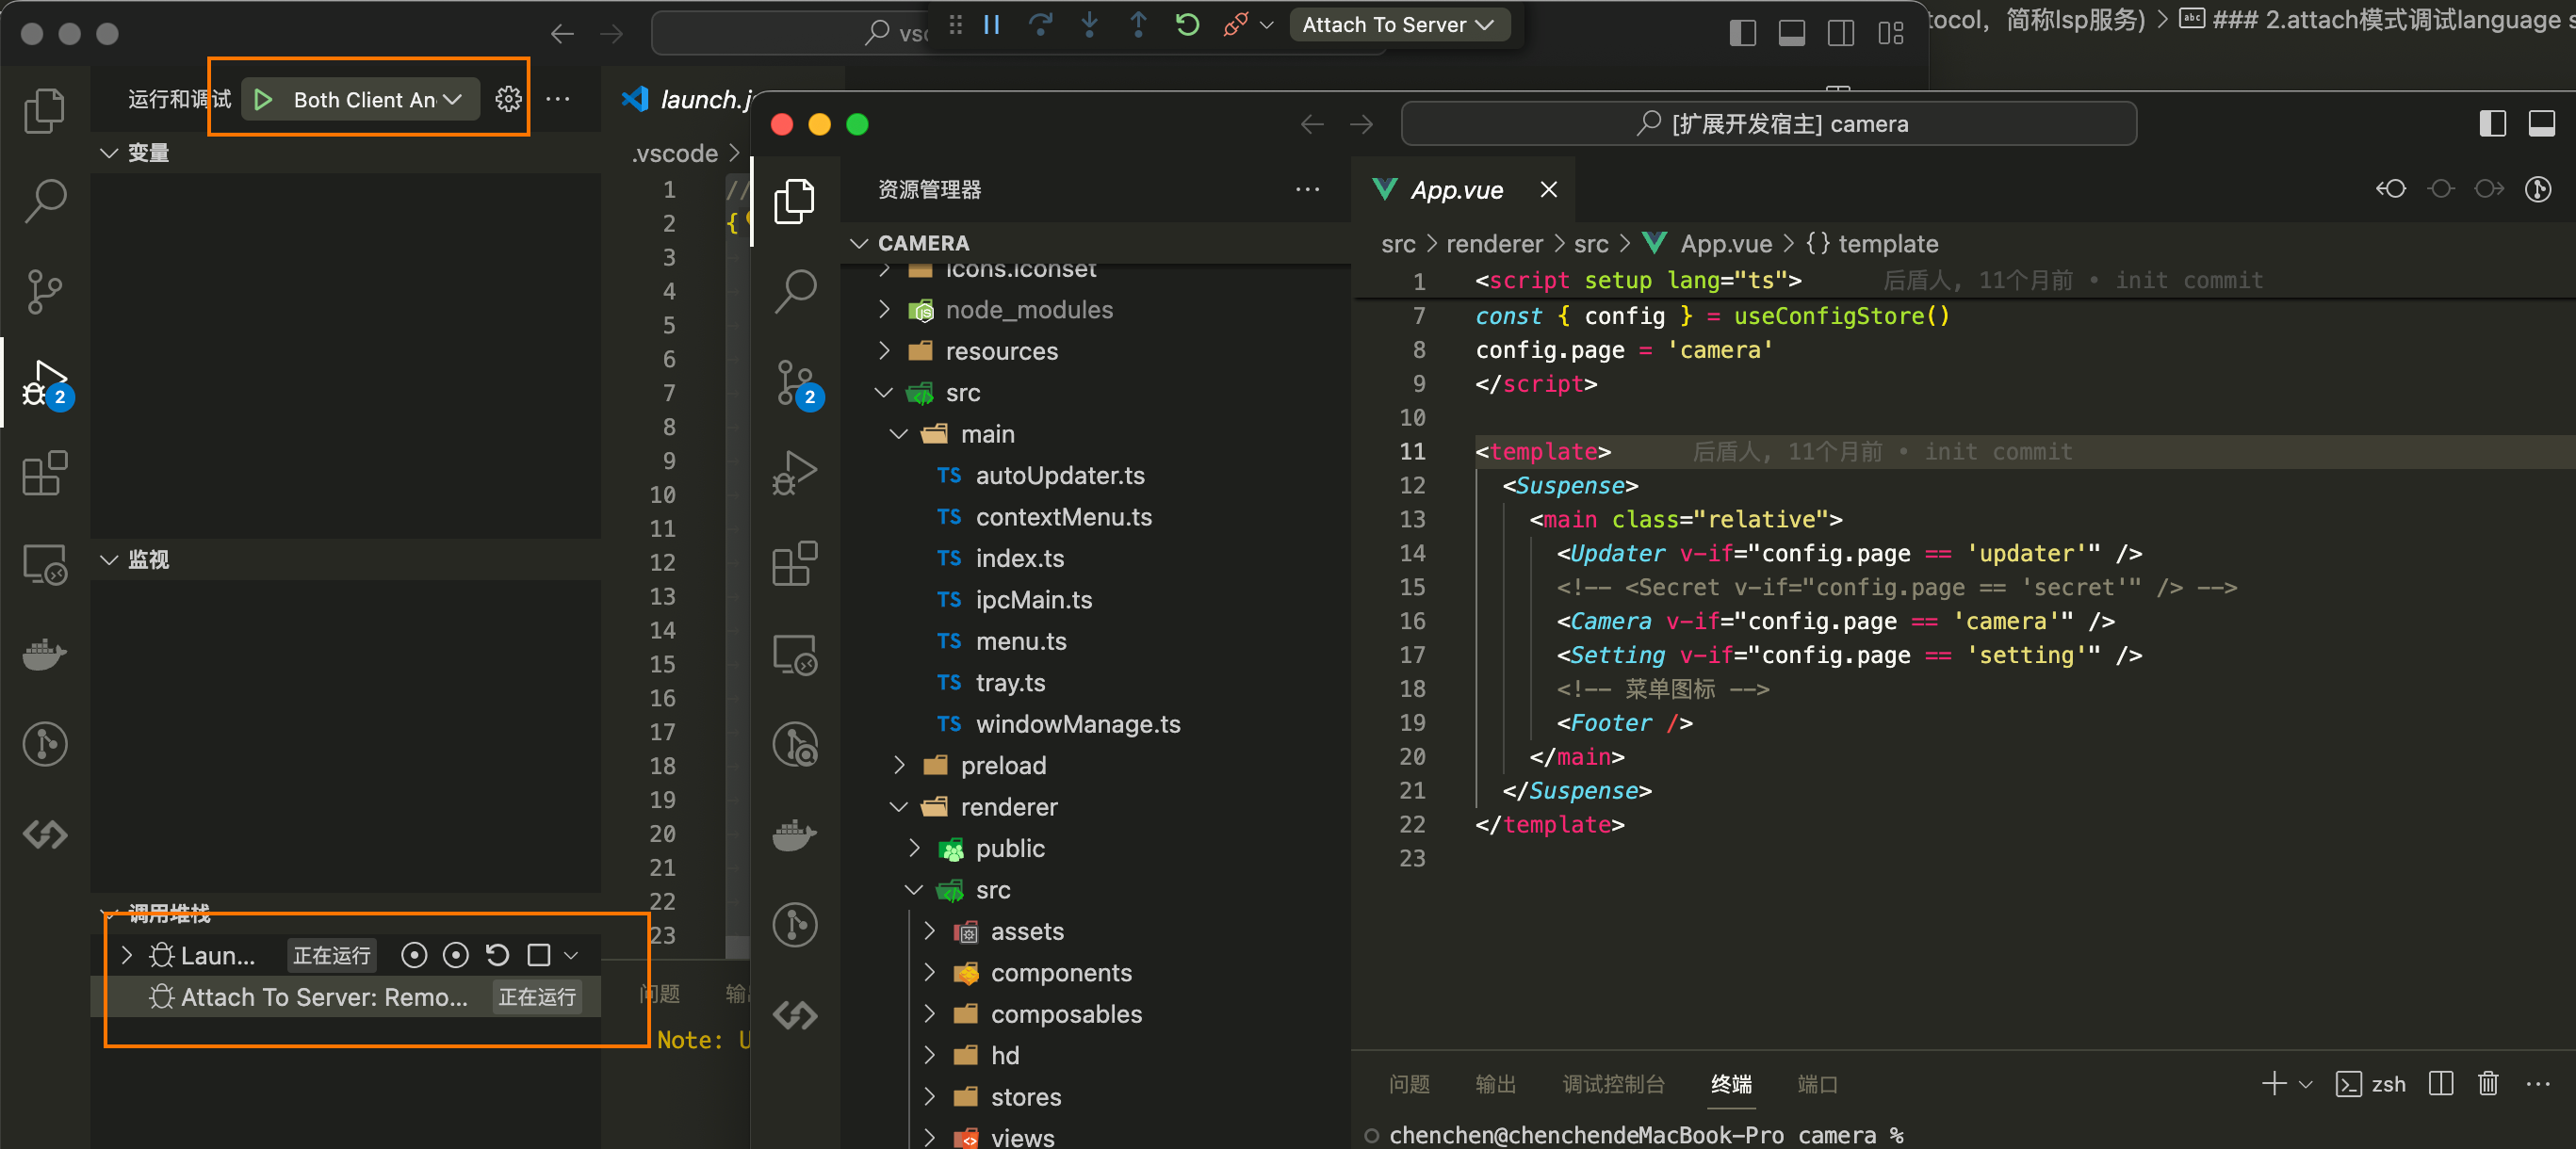
 cc的学习历程